RenPy_Visual_Writer
A downloadable RPY_WriterUI
Also available on github:
https://github.com/tacyak8/renpy_visual_writerUI
Alpha with plenty of problems and missing features! Comment if you like or with any simple suggestions.
📖 RPY WRITER — README
A visual builder for Ren'Py location-based games
WHAT IS THIS?
RPY Writer is a node-based visual tool for building Ren'Py game scripts without writing code by hand.
You design your game's map, characters, interactions, and story flow visually on a canvas. When you're ready, click Generate Script and it downloads a working .rpy file you drop straight into your Ren'Py project.
It is designed specifically for location-based games — games where the player moves between places, time passes, characters follow schedules, items are collected, and story unfolds differently depending on who's present and what's happened. Think visual novel / mystery / life-sim hybrids.
This is an alpha release. It works, it generates valid Ren'Py scripts, but there are known limitations listed at the bottom of this file. Contributions welcome.
SETUP
See HOW_TO_SETUP.md for full instructions. Short version:
- Install Node.js from https://nodejs.org
- Run
npm installin this folder - Run
npm run dev(or use the launcher scripts) - Open
http://localhost:5173
HOW TO USE IT
Start with the Story Master
When you first open the app, set up the Story Master node. This defines everything global about your project: game type, time system, active days, characters, point/stat trackers, how chapters progress, and what shows on the HUD. Set this up before building anything else.
Build your map
Right-click the canvas to add nodes:
- 📍 Location — a place the player can visit
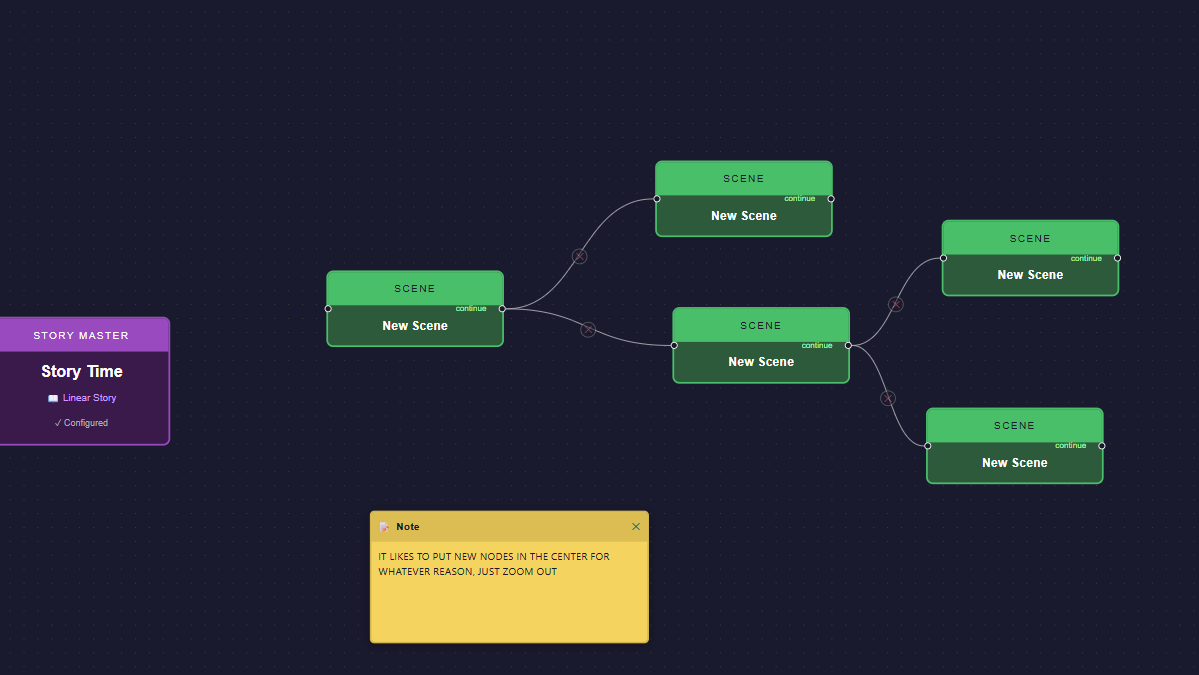
- 🎬 Scene — a linear sequence for cutscenes or story beats
- ⚡ Transition — plays at game events (start, chapter changes, etc.)
- 📝 Note — canvas annotation only, not generated (use these to document your design)
Connect Location nodes with edges to define navigation. The player will see a "Go to X" menu based on how you wire them.
Fill in your locations
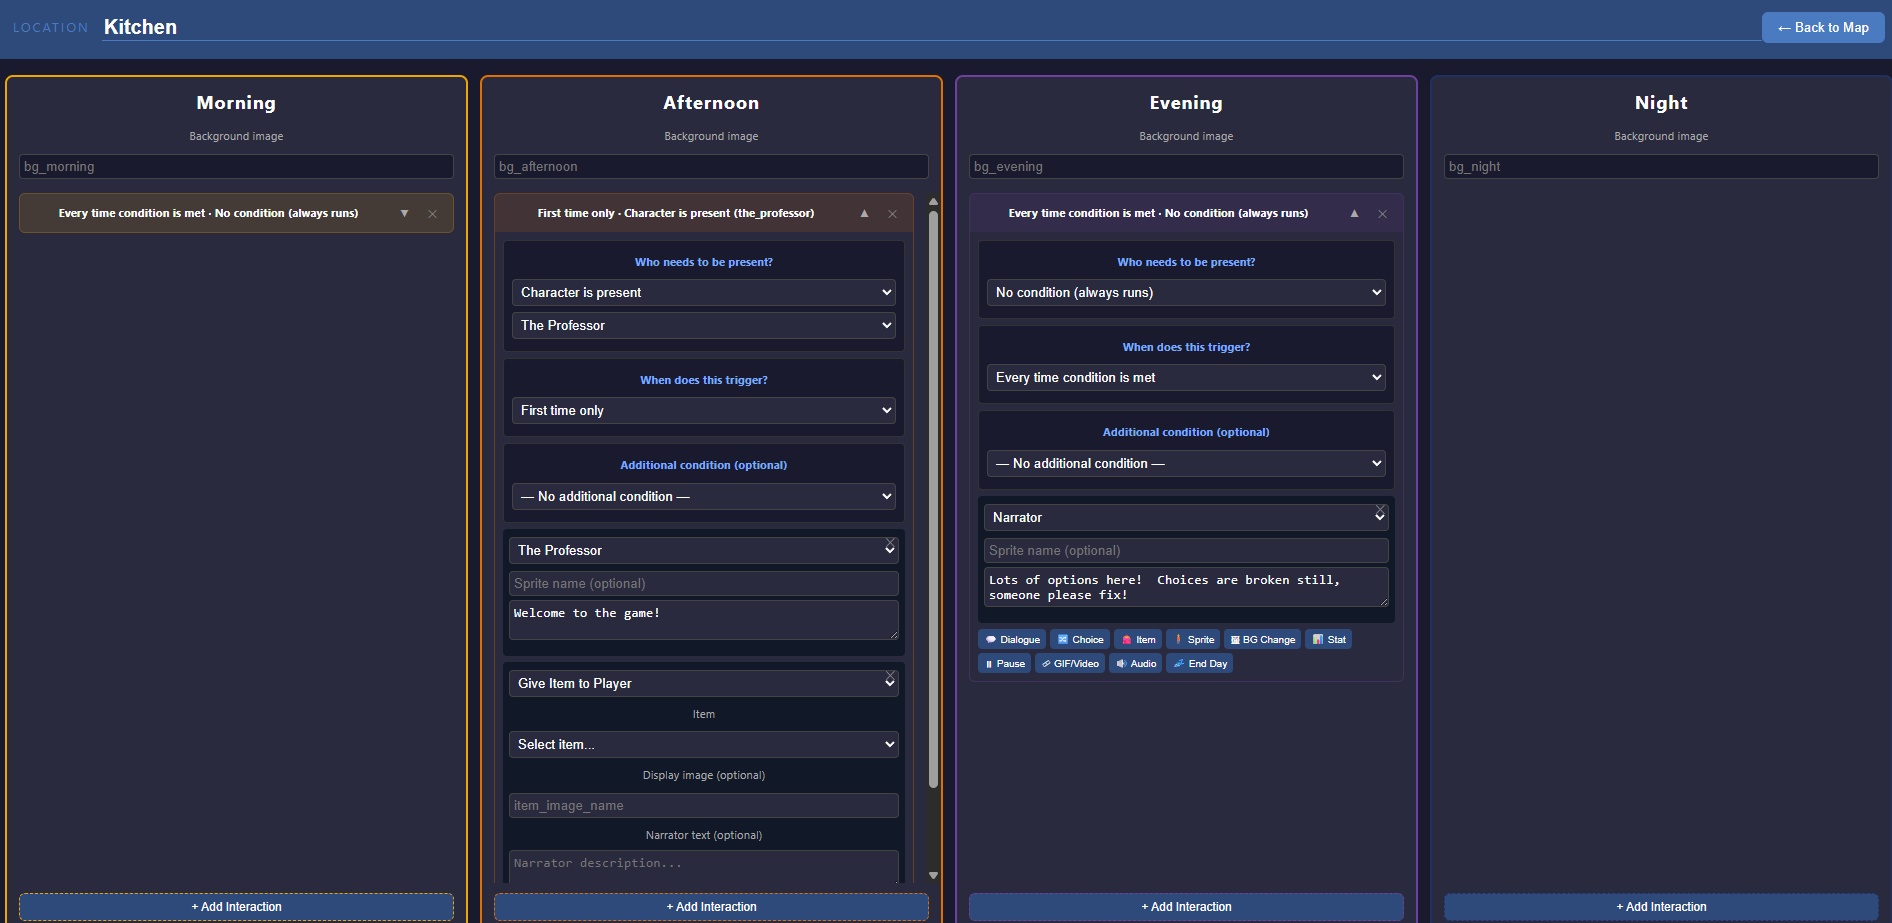
Double-click a Location node to open its editor. Each location has a column per time period (Morning, Afternoon, etc.). Inside each column you add interactions — each one defines:
- Who needs to be present (a character from your schedule, no one, or an item)
- When it fires (first time, every time, Nth visit, after first)
- An optional extra condition (a flag, a stat threshold, an item in inventory, the day of week)
- The actual content: dialogue, item gives/takes, stat changes, background changes, audio, sprite changes, or an End Day block
Group locations into chapters
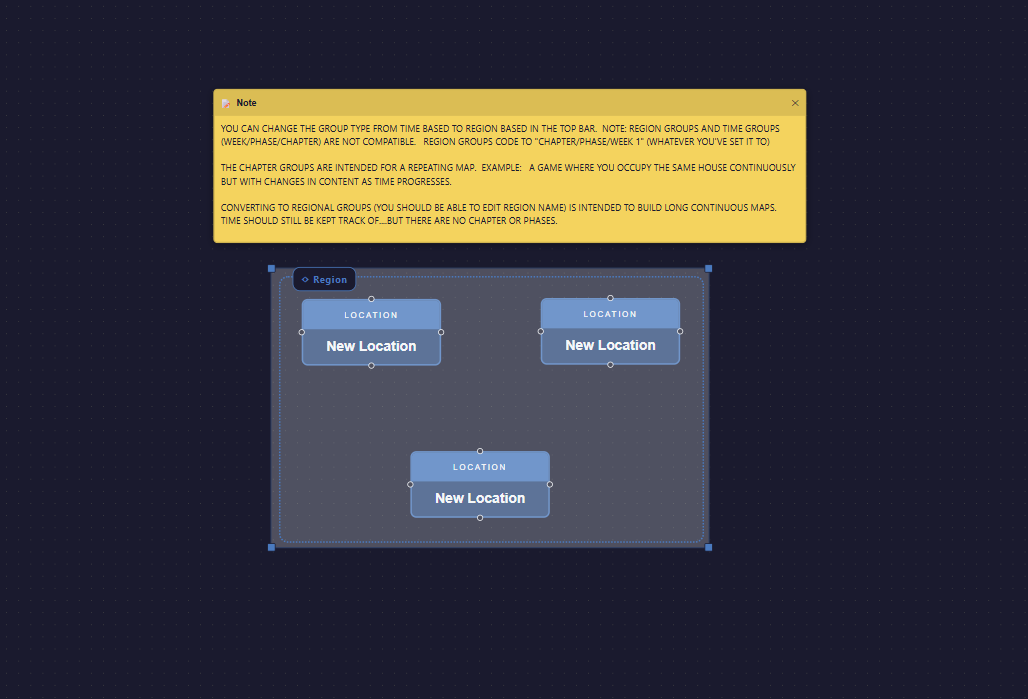
Select multiple Location nodes and click 📦 Group Selection (or right-click the canvas). This creates a chapter group. Groups are numbered automatically. Each chapter group generates a chapter_N_start label in the script.
To toggle a group between Chapter (drives progression) and Region (visual organization only), select it and use the button in the top bar.
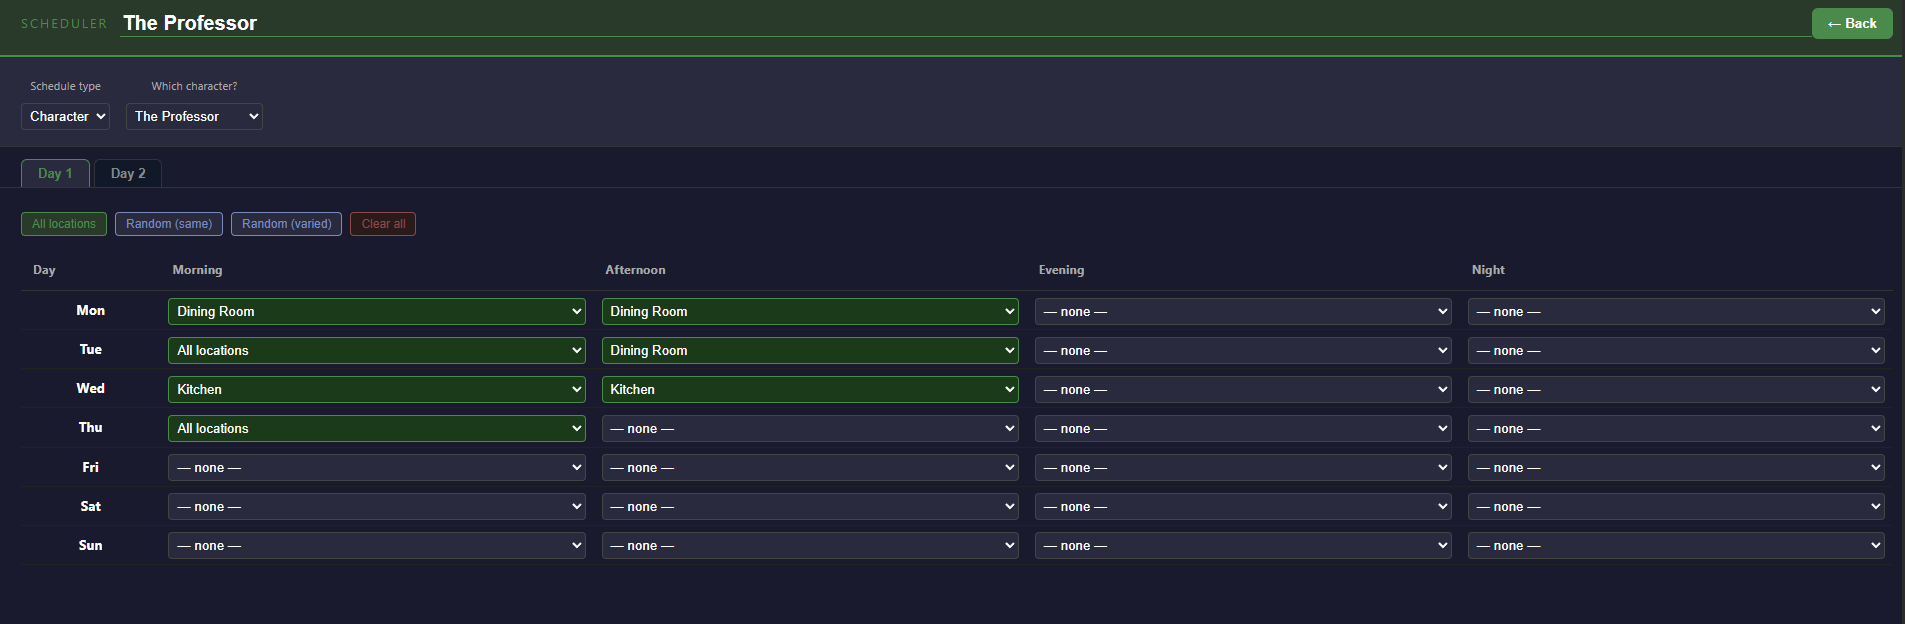
Set up schedulers
Open the Schedulers panel. Add a scheduler for each character or item you want to track. Fill in the grid — for each day and time period, choose which location that character is in. Interactions in locations check the schedule to determine if a character is present.
Schedulers are per-chapter: use the chapter tabs in the scheduler to set up different schedules for different phases of your game.
Generate your script
Click ▶ Generate Script in the top bar. This downloads a .rpy file named after your project.
Place it in your Ren'Py project's game/ folder. It can coexist with your existing script.rpy or replace it — your call.
YOUR REN'PY PROJECT STRUCTURE
MyGame/ game/ MyGame.rpy ← your generated script goes here images/ ← backgrounds and sprites audio/ ← music and sound effects gui/ ← Ren'Py GUI files (leave alone unless customizing)
IMAGES AND AUDIO — READ THIS
Ren'Py builds image names from filenames automatically by lowercasing and splitting on spaces/underscores. The filename needs at least two words.
| File | Reference in tool |
|---|---|
alice_happy.png
| alice happy
|
bg_kitchen.png
| bg kitchen
|
bg_forest_night.png
| bg forest night
|
In sprite and background fields in this tool, type with spaces — not underscores.
The first word is the "tag" (the character or bg type). The rest are variant attributes.
- Sprites: PNG or WebP (need transparency)
- Backgrounds: JPG, PNG, or WebP
- Audio: MP3, OGG, or WAV — goes in
game/audio/
TWO GAME STRUCTURES — CHOOSE ONE
RPY Writer supports two distinct ways to structure a game. They are not currently compatible with each other in the same project.
Chapter-based games
The same map repeats across phases/weeks. Progression is driven by points or time. Each chapter group on the canvas becomes a chapter_N_start label. The player relives the same locations but with evolving content.
Best for: mystery games, life sims, relationship builders, games with distinct story phases.
Region-based games
A large connected map. Time is tracked but is not what drives progression — moving between regions is. There are no chapter labels; all locations exist in one continuous space.
Best for: RPGs, exploration games, open-world adventures.
⚠️ Do not mix chapter groups and region groups in the same project. Locations in a region group will silently fall back to Chapter 1 in a chaptered game. This is a known limitation for v1.
IMPORTANT: GROUP MEMBERSHIP IS GEOMETRIC
A location belongs to whichever chapter group box it physically sits inside on the canvas at the time you click Generate Script.
Dragging a group box does NOT automatically move the nodes inside it — they stay put and the box moves away from them. If that happens, those nodes lose their chapter assignment and fall back to Chapter 1.
To move a group with its contents: select the location nodes AND the group box together, then drag.
KNOWN LIMITATIONS (alpha)
These are documented gaps, not surprises:
- Choice consequences are not yet generated. The choice options appear in the script as a menu, but the content inside each choice branch needs to be added manually in Ren'Py for now.
- Scene entry points — scene labels are generated but nothing automatically calls them yet. You can trigger a scene by wiring it manually or via a future block type.
- Mixing chapter and region groups in the same project is not supported yet. See above.
- Group dragging doesn't move child nodes. See above.
- No undo. Save your project frequently (the Save button in the top bar downloads a
.jsonfile). - Transition triggers (Chapter Start/End) currently fire for all chapters, not a specific one. Per-chapter targeting is planned.
SAVING AND LOADING
Use the Save button in the top bar — it downloads a .json project file. Use Load to restore it. Keep your .json files — they are your project source. The .rpy is generated output and can always be regenerated.
CONTRIBUTING
This is an open alpha. If you build something with it, fix something in it, or have ideas for it — pull requests and issues are welcome.
Key areas where contributions would be most valuable:
- Group dragging (React Flow parent-child node refactor)
- Undo/redo history
- Choice consequence generation
- Scene entry point wiring
- Per-chapter transition triggers
- Multi-region / multi-chapter support
TECH STACK
- React + Vite
- React Flow (canvas)
- Runs entirely in the browser — no server, no database, no account
Download
Click download now to get access to the following files: